 Loading... Please wait...
Categories
 New Products


Our Newsletter
- Home
- Water Quality Improvement
- Waterite Micronizer
- Home
- Water Quality Improvement
- Aeration components
- Waterite Micronizer
- Home
- Water Quality Improvement
- Radon removal
- Waterite Micronizer

Product Description
The world's preferred air injection valve used in dozens of countries as an ideal injector for:
* Chemical-free iron and manganese removers
* Control of dissolved air floatation (DAF) systems
* Ozone disinfection systems
* Standard in all Paterson Iron Removal Systems
* This is a great replacement air injector on Provectr water treatment systems

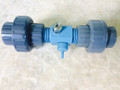
The Waterite Micronizer consists of a high impact Celcon® plastic body containing two water passages. The water passage closest to the check valve (2) contains built-in convergent and divergent cones forming a venturi. The venturi causes air to be drawn into the water stream when water is flowing.
The second water passage acts as a by-pass. The percentage of water flow allowed through the by-pass assembly is regulated by the valve gate (5) and gate retainer (6) assembly. This in turn regulates the amount of air drawn into the water stream through the venturi. Turning the valve gate screw at the same time, forces more water through the venturi passage. This in turn causes more air to be drawn into the water stream. In the event that parts must be replaced, this can be accomplished by following a few simple instructions:
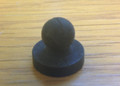
1. To replace die rubber check valve (2), wet the check valve with water or silicone oil and install it in the main body. Thread the cap down snugly by hand. Do not over tighten. Failure to lubricate the rubber properly will cause the valve to twist inside the cap and will result in leakage of water through the valve. If this should occur, remove the valve, relubricate, and install it.
2. To replace the o-ring or valve gate/ gate retainer assembly, start by lubricating the rubber o-ring with water or a silicone oil. Carefully insert the o-ring into its seat in die bottom of the hole in the main body. Thread the valve gate fully into the gate retainer. Thread the gate retainer into the main body by hand to a snug fit. With the use of a suitable tool (wrench or pliers), turn the gate retainer another 1/4 turn into the main body. Do not over tighten.
Note: To prevent leakage at the 1" NPT threads, use Teflon tape during the assembly of the Micronizer to the plumbing system. Care should be taken when wrapping the tape over the threads to ensure that no tape enters the Micronizer and blocks the venturi.
Installation of your Micronizer in a Private Well Water System
1. Start Up Procedure
See figure 1 below to review a typical air injection system configuration. The air should first be flushed from the filter tank and the filter media conditioned.

a) Check to verify that die Micronizer Adjusting Screw is in the fully open position (turned fully counter-clockwise).
b) Adjust the pressure switch to ensure a 20 psi differential between cut-in and cut-out, (example: 20-40 psi) for the pump.
c) Partially close valve D, turn on the pump, thereby filling the pressure tank and slowly filling the filter tank until water overflow appears at the backwash.
d) Fully open valve D and backwash until the water to drain appears free of air. Cycle to “Backwash-Rapid-Rinse" several times to completely remove the air and orient the filter bed, then turn the control handle to "Service".
2. Adjusting the Micronizer
a) The proper adjustment of the Micronizer to provide a colloidal suspension of the iron is a final and important step.
b) Close valve D. Close down the Micronizer Adjusting Screw three turns by rotating it clockwise.
c) Open valve D and open a faucet in house. Then control the water flow with valve D. Drain water from the pressure tank until the pump starts, then immediately turn off Valve D. Using the second hand on a watch, time the pump-up cycle (i.e. the time from the low pressure cut-in of the pump to the high pressure cut-out.) Assume a time of 99 seconds.
d) Re-open valve D until the pump starts, then immediately shut Valve D. Determine the time of air-draw at the Suction Nozzle. This time should be 30% of the total pump-up time, (i.e. 30 seconds). If the air draw time is more than 30 seconds, turn the Adjusting Screw (counterclockwise) slightly. If the draw time is less than 30 seconds, turn the screw clockwise. Determine the total pump time after each adjustment, since this time will change as the Adjusting Screw is being reset.
e) If all the iron is not being removed at the 30% setting of the Adjusting Screw, after 4 weeks, increase the air draw time to 35% of the total pump-up time (35 seconds).

If you want to make removing and servicing your micronizer easier consider installing it on schedule 80 unions.


Looking for the check valve?

https://www.wellwaterproducts.com/products/Replacement-Check-Valve-For-Micronizer.html
Sometimes misspelled Waterrite micronizer
